Sunday, September 30, 2012

Polyvore Collage Day - Favorite Character from a TV Show

The Second Polyvore Collage Day is here!

If you want to join and/or read more about it, here's the post with all the details.And here is Last Week's Themed Collages: Autumn

This week's theme was Favorite Character from a TV Show 

I watch a bunch of shows, but none of them really have a character that has a certain style, most being generic "next door neighbor" or ""that FBI/CIA lady" but since I used to watch Gossip Girl when I had the chance, I figured Serena would be a good pick.
So here it is, Gossip Girl's Serena van der Woodsen inspired set


Fav Tv Show Character Set for PolyvoreCollageDay


She usually wears  these shiny pieces, be it either the top or the bottom, and at least one piece of statement jewelery.
So I paired up a regular looking shirt with some cool bottoms and a very visible gold necklace. For someone who, as far as I've seen, always walks around in heels, these suede booties looked like a good choice.

I'm starting to think I should give a combo like this a try sometimes, actually!

If you wanna collage away next week, make sure you let me know in a comment or on Twitter @TreasureChestt you want to join. And make sure you VOTE for next week's theme right here:


What do you want next week's theme to be?
  
pollcode.com free polls 


Here's the collages of the other lovely ladies taking part in the Polyvore Collage Day. If you too have created a collage after reading this post, you can add your link right here:


                                       You can also Follow on * Twitter * FacebookBloglovin *   

Saturday, September 29, 2012

The Perfect Ginger Tea

It's autumn, have you noticed? I do believe you have.

That means there's a big chance you started overdosing on hot beverages, much like myself. In my quest for awesome teas, I've come across a ginger root and while staring at it, I started thinking "You could go in my cup,couldn't you?". And it did.

Ginger in a Cup I called it, later realized it wasn't the most appropriate name and renamed it Ginger Tea. Lack of originality galore right there, but we can't be all cannibalistic with gingers in cups, can we?

In any case, I wish to share my new discovery with you, because not only does it taste good, but it's also healthy and might save your life in case of colds.


You will need:

The Ginger: preferably a root, not a human
Lemon: can't really be mistaken for a human, so I think that one's a safe description
Honey
Boiling Water

What to do with it:

  • First up,cut some ginger root slices. You can slice, dice or whatever other shape you wish to give it, just try to cut it relatively thin so that the flavor comes out easier. I put about 3 slices in the cup
  • Pour some boiling water over the ginger slices and let it sit for at least 3 minutes
  • Add your lemon first and then the honey. There's no right or wrong here, add as much or as little of both as you wish.
  • ENJOY!

I've been overdosing on this tea for the past couple of days and I've only toned the consumption down because I'm slowly running out of ginger. But it's definitely one of my favorites now and I think it's going to be a staple drink this winter!


                                       You can also Follow on * Twitter * FacebookBloglovin *   

Friday, September 28, 2012

Alove Solid Lotion Bar Review


I think you remember seeing this little fellow around, haven’t you?
That’s because it’s my new favorite thing!
You might have heard me complain about dry hands, dry nails and dryness in general. It’s because once autumn got here, so did a completely new climate that your skin might or might not have gotten used to very easy. In my case, I have hands that feel a bit like parchment paper. And with them, the rest of my skin also.
I can only foresee the moisture I’m going to need once winter hits.

In any case, this little thing of  beauty has been a life saver!
Apart from its super cute packaging and shape(who can resist a cupcake, I ask!), it also has the ingredients that I LOVE!
Shea Butter, Pomegranate Oil, Coconut Oil, Avocado Oil and Vitamin E.
I’ve swooned about Shea Butter here already and what I can tell you about the other oils is that they are known for their glorious capacity to moisturize!

Alove is a really new company and counts as an absolute insider tip. They only work with organic and natural certified ingredients and of course no preservatives other than what you’d find in nature. The Vitamin E in this case serves as preservative. And in the end, when you have a product based on natural oils and fats, you don’t need much else to keep it fresh. I don’t mean fresh forever, but about 6 months for sure.


The reason why I stumbled upon this brand is because I know the person who makes them. She’s in the process of setting up her own webshop and blog. You can find the Blog HERE and I suggest you follow because once she goes live, you’re going to want to see what goodies she has to offer. I can guarantee they all look this cute!

Solid Lotion Bar I say? Well yes, because it is a Shea butter based bar that is a moisturizing beauty! Super practical because it is well…solid, and that means you can pretty much stick it in your pocket and whip it out whenever you feel something dry on you.
I use it for hands, body and even face and lips when I need to.
It's especially handy when your legs feel dry after you shave them. One stroke of this and you're set.
I put it in a zip-lock bag and always carry it around with me so that my hands are perfectly moisturized whatever the weather.

This what it looks like in the nude.
It's around 100g that will last you for a surprising amount of time. I've been using it for weeks and it's not even halfway through. Definitely worth investing. It costs 5 Euro for what you see here, which to me is pretty cheap, considering I would have gone through two bottles of lotion by now if it wasn't for this.


All in all

A’love it! Good one,huh? Well I indeed do, because it combines all the natural ingredients I absolutely adore, has zero preservatives and basically does 100% good to my skin.
The truth is, I’ve gotten to the point where after using it for a week, I don’t even feel my skin dry anymore. I think it kinda balanced it out somehow and my skin is just in a nice, happy state.

This smells like lavender ( and you can WIN one of them if you enter my First International Giveaway Here) but there was also rose, lilac and something that smelled so delicious that I was afraid I'd take a bite. Think lilac will be next on my list for sure! In case you were wondering, it is essential oils that give it the smell, so no weird ingredients there either.

I suggest you follow the Alove Lady and check this little beauty out when you have the chance, it will probably do as much good to you as it did to me.


                                       You can also Follow on * Twitter * FacebookBloglovin *   

Thursday, September 27, 2012

Swap Goodie Box Is Here!

Guess what arrived?

A while back, I signed up for a Blogger Swap that BBloggers Unite and the lovely Lola were doing, and got paired with the super awesome Rebecca who lives all the way Down Under in Australia.

Today, I woke up to the great surprise of her package being already here! I'm gonna be honest and say that I expected to take much more for it to arrive, I was already in patient mode when I got this awesome thing!


There's yummy chocolates (that have already been eaten up entirely and much enjoyed), serums,face mask, hair mask, nail polish, lip goodies and an amazingly smelling candle.

If I didn't know any better, I'd start suspecting that Rebecca has been spying on me because she was spot on with the nail polish color! I'm a mint maniac and can truly not get enough o the color!
Not to mention the candle,which was an awesome surprise as I also have a huge candle collection.

One thing I know I'll be showing you is the Paw Paw Lip Balm (bottom left corner in this picture). I'm thinking Paw Paw stands for Papaya? It has the most delicious smell and it gets along really well with my lips from what I've seen!

The best thing is, all of these are pure Australian! I love getting to try out products from a place so far away that I probably wouldn't have found out about otherwise.That's why I like swaps, they get you in contact with so many new and interesting products and with lovely people!

Thanks so so much Rebecca! Hope my package gets there soon too and you like it as much as I liked this one!

I cannot wait to try them out and let you know all about it!

Any one of them you want me to try first? Can't show off the chocolate anymore as it's in a much happier place now: my tummy.


    You can also Follow on * Twitter * FacebookBloglovin *   


Wednesday, September 26, 2012

Pink Pretties: The Girly Beauty Products

Let's face it, we're all girls, or at least most of us here. Which meas that along the way we have given into pink once or twice. Maybe we're not wearing pink shoes or pink dresses, but sometimes you see something pink and go "how cuuuuute!".
Even I admit to it.

So I figured I'd round up some of my products that make me feel really cute and girly and show them to you.


That's a lot of pink you say? Why yes, yes it is!
And I threw in a lollipop for good measure. The Pink demanded it!

Let's see what we have, shall we?

Eyeko Fat Brush

Not pink per se, but pretty with a touch of pink. Would be magnificent if they'd actually do a mascara in fuchsia or another bright tone like that. I'll admit I might end up very tempted to buy it. If after my numerous mentions of this gorgeous thing, like in my August Favorites , in The Battle With Chanel and MAC or in my actual Review about the Eyeko Fat Brush , you still don't know Mr Eyeko, then I suggest you check those out, to see why this is a product I won't be giving up soon.
That and it's so fluffly I'm gonna die!!!

China Glaze Hang Ten Toes

This polish is from the Summer Neons that China Glaze brought out and it's more than anything, the girliest pink I own. Not to mention it also being a neon. I say, a pink win-win situation right there!
If you wonder what it looks like, then wonder no more, because you can see it on my nails Right Here

Alove Lotion Bar

This recent discovery of mine came courtesy of a good friend who actually makes them. That's why I can also be sure that the ingredients listed are indeed in it and when I say it's organic and preservative free, I have the certainty it is indeed. Avocado, Coconut and Olive Oil, plus Shea Butter AND Vitamin E in one little cupcake. It has been a life saver so many times. Its size makes it super handy to just carry around and whip out even when only your hands are feeling a bit dry,and let's face it: How cute is the pink polka dot packaging!!!
You can win one of these if you check out my International Giveaway, so I think even just for this, it's worth entering.

FM Baked Blush

I'll go ahead and admit I have no idea what brand FM is. My mother came to me one day and gave me this blush, and I have to say it looked so pretty and even prettier on my skin, that I decided to hang on to it.

Lollipop

Its first cameo on the blog, so everyone, a round of applause! The sad news is...lollipop didn't make it. The good news is, it was delicious!

But tell me, don't you have some pretty products you just love looking at and that make you feel way more girly than usual?


                                       You can also Follow on * Twitter * FacebookBloglovin *   

Tuesday, September 25, 2012

Blue Pinky Swear Against Bullying Campaign

A couple weeks ago, I posted about the Blue Pinky Swear Against Bullying Campaign that MeanStinks started. The whole post about it is HERE

I wanted to do a post to raise some awareness about bullying and how awful it is, in all of its shapes and forms, wherever and whenever it happens.

I was lucky enough to have some lovely girls want to join in, and you can see their links at the bottom of this post.

Here's my input in this campaign.
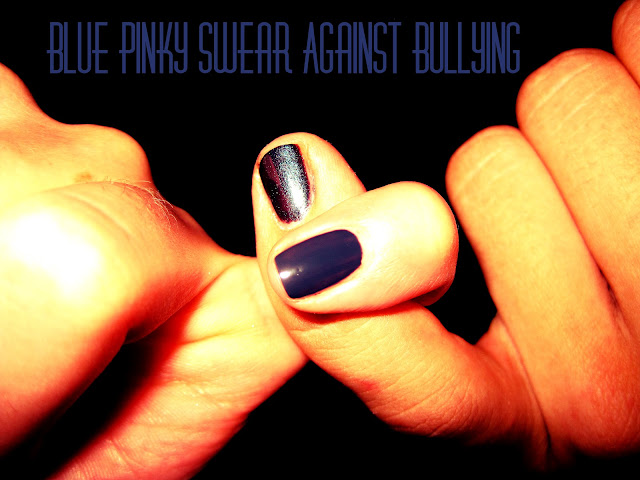
I recruited my manlier half to help out and you can clearly see his dedication to the cause if he even let me put nail polish on his pinky.

Essie Bobbing for Baubles swatch and DIY self made franken nail polish


( In case anyone was wondering, I'm wearing Essie - Bobbing for Baubles and the manlier half is wearing the polish that I created. You can see an actual swatch of it Here )


I've also had the lovely Anntaylor want to help with her pinky and you can seen her picture by clicking her name!


What You Can Still Do

Paint your pinky nail blue and take a picture of it. Any blue will do.Be creative or keep it simple,it's completely up to you.
The InLinkz  are still open for submissions, so feel free yo add your picture or link to your post about the picture by clicking "Add Your Link"

Get the message out! You can Tweet about it, Blog about it, Facebook or text someone about it.
Every bit helps!

Hope to see your pinkies soon! :)


    You can also Follow on * Twitter * FacebookBloglovin *   
     

Monday, September 24, 2012

Monday Blues: My Self Made Polish!

Hello Monday...again.

Well this Monday, I have an awesome thing to show you! If you haven't seen my Tutorial on Making Nail Polish(<-- it's that one,it's that one!), last week, I made my very first nail polish in the color I had been looking to find for ages!

This is how it all began


And then, after the few steps I described in the Tutorial it ended up looking like this!


I was surprised how well it looked on my nails, how fast it dried ( less than a minute!) and how much it lasted. Loved the shimmer of it and how it had a gorgeous cool blue tone I couldn't find anywhere in this particular combination.

It's the dusky dark blue I was looking for and I'm so so sure that it will be the shade I will be wearing A LOT for the rest of the year
I don't know if you've seen my Metallic Polishes Top 5 , but this polish will definitely be making an appearance in the updated Top 5.

Now here's the thing, I can't have a favorite polish without a name, right?
So my question to you is: What should I call this polish?


Also, check out the other lovely ladies who went all blue today

Gosia from Life in Color!
Mihaela from Lacquerbuzz
Marisa from Polish Obsession


You can also Follow on * Twitter * FacebookBloglovin * 


Sunday, September 23, 2012

Polyvore Collage Day - Autumn

Exciting stuff, the first Polyvore Collage Day is here!

If you want to join and/or read more about it, here's the post with all the details.

This week's theme was voted to be autumn so without further ado, here's what my autumn looks like:


Autumn Collage


As I might have hinted, and will probably continue doing, the color I will be wearing a lot is navy and dark blue tones in general.
I also feel that we all need a cute, fluffy sweater for those days where you just wanna snuggle up in a sea of warm.
A good pair of jeans will save the day most of the times, so investing in something that can become a fast favorite is advised.
The Jeffrey Campbell boots are a bit of an obsession of mine and I haven't been fully convinced to buy a pair yet, but this could be the season.
And the Essie Bobbing for Baubles polish.... navy blue makes an appearance again! 

I couldn't really help myself and I made another collage, with some of the same items, but then a couple of others I wanted to include in the first collage but it would have gotten a bit too crowded if I had


Autumn Collage 2


UPDATE : You voted and Next Week's Theme is : Favorite Character from a TV Show


Pick your character and create away! 
Remember to publish them on Sept 30th and send me your email so I can send you the inLinkz code that links all our posts together!


If you wanna collage away next week, make sure you let me know in a comment or on Twitter @TreasureChestt you want to join.


  You can also Follow on * Twitter * FacebookBloglovin *    


Saturday, September 22, 2012

Organic Rose Water Face Toner

I am someone who is VERY careful with what touches her face. I've been lucky enough to not have problems with it and intend to keep it that way.
The one thing I couldn't control or reverse are the years I spent in the pool with swim training, surrounded by face destroying and skin drying chlorine.
So now, all I can do is try to keep my newly dry skin happy.

I normally use organic oils, like The Amazing Apricot Oil I posted about, or just as organic butters, like Raw Shea Butter that I was also praising a while back.

I think that the more natural, the better. This brings us to my newest favorite: Organic Rose Water


Like I said in the post about the apricot oil , it's always best to get your products as close from the source as possible.
Bulgaria is known as being the world's biggest Rose Water producer, so when I got this in Romania ( which borders to Bulgaria) I was lucky enough to pay considerably less than if I had gotten it anywhere else, if I would have found it to begin with.

This thing is beautiful! It has one ingredient: Roses , which is right up my alley when it comes to keeping the ingredient list short. You can't really beat one ingredient,can you?

I use it every morning on my face. I don't wash my face anymore, I clean it with rose water and my skin looks like I had been walking in fresh air for hours.

Benefits:

  • Some say that rose water is a source of antioxidants, which can help strengthen skin cells and regenerate skin tissue. It is said to be especially good on sensitive skin types (such as my face).
  • Those like myself, who have dry skin, can use rose water as a moisturizer. The natural oils in the petals trap moisture and the sugars found in the rose water have a soothing effect on the skin.
  • Because rose oil has anti-inflammatory properties, using rose water can help in reducing the redness from irritated or over-heated skin. Of course if you have rose oil at hand too, add a drop of that and you get extra points.
  • It is a great cleanser and removes oil and dirt accumulated in clogged pores. That's why it's perfect for preventing acne and pimples.
  • It has astringent like properties (closes up pores), which is why it is used after facials and clean ups to close open pores. 

I say you give it a try if you can, if you can't get hold of it, let me know and I'll try my best to help you!

And I don't know if you've seen it yet, but I'm holding my First International Giveaway where you can win some of my favorite products!


You can also Follow on * Twitter * FacebookBloglovin *   


Friday, September 21, 2012

Making Nail Polish!

It would seem that I'm in  DIY fever, wouldn't it?

Well the thing is, I gave making  nail polish a shot and seem to have created the color I had been looking for most of the year and that I'm sure I'll be wearing a lot this autumn!
Couldn't believe it worked out so well and have been staring at it ever since.
What I was also surprised by was how easy it was to make!

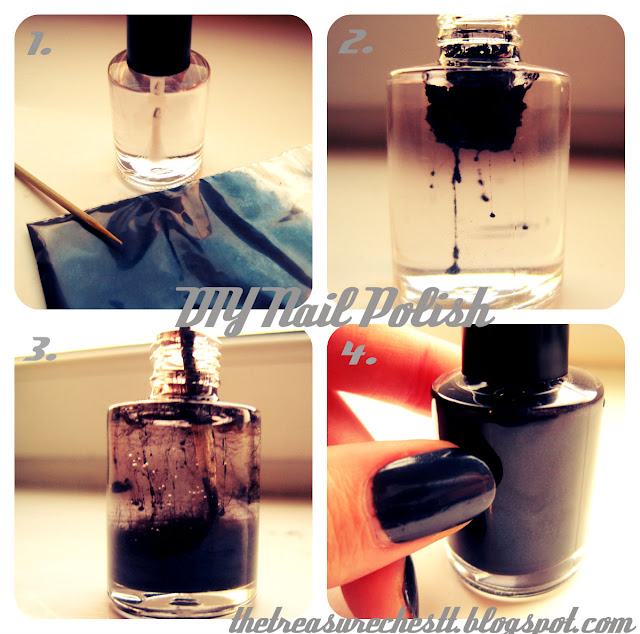
It takes a couple of super easy steps and you can create the shade that you've always wanted and could maybe never find or get your hands on!


Step 1

Get a transparent nail polish, the colors you want to mix and a toothpick to mix it with.The color should be in powder form; either get a pigment or pick some eyeshadows and scrape them off on a piece of paper. If you've scraped your eyeshadow dust off, make it as fine as possible by pounding it a bit more so that it breaks up in smaller pieces and ends up being like fine dust.
You can pick ONE or MORE colors to play with and mix around.

Step 2

Pous the powder into the polish bottle either with a small funnel or with an improvised funnel by bending a piece of paper in the middle and using it as a slide.

Step 3

Use the toothpick to mix it in the beginning and then shake it. It's much easier to mix it by shaking, especially with just pigments.

Step 4

In step 4 you can just sit back and admire the gorgeous shade you have created


Have you ever tried making your own polish? How did it work out?

Also, make sure you've entered my First International Giveaway to win some of my favorite products!


You can also Follow on * Twitter * FacebookBloglovin *   

Wednesday, September 19, 2012

My First INTERNATIONAL GIVEAWAY!

Hey Lovelies!

The time has finally come to do my first Giveaway!
I didn't really know what to give away but I figured some of my favorite things might be the best pick
So here they are:


We have,

The Eyeko Fat Eye Stick
Two Dr van der Hoog Face masks, one of which I even reviewed HERE
The Rimmel Bright Back At You Polish that you can also see on my nails In This Post
AND The amazing Alove Solid Lotion Bar that I will review really soon and that I love! Coconut,Avocado,Apricot Oil  and Shea Butter goodness with the gorgeous smell of lavender!


The Rules  

This Giveaway is open Internationally to all 18+
In order to have a Valid Entry you need to : 
  1. Follow on GFC
  2. Follow on Twitter
  3. Leave a Blog Comment with your email or a way to reach you, as I have to let you know in case you win 
  4. When you Tweet about the giveaway, mention me in the Tweet ( @TreasureChestt ) so I can check the entries easier.  You Tweet can sound something like this if you have no inspiration at that moment: @TreasureChestt ia holding her first International Giveaway! Check it out here: http://thetreasurechestt.blogspot.com/2012/09/my-first-international-giveaway.html
Keeping my fingers crossed for you!


a Rafflecopter giveaway


You can also Follow on * Twitter * FacebookBloglovin *   

Tuesday, September 18, 2012

Swirl Nails Tutorial

Last week, I posted these Swirl Nails I had made, after first seeing them Here, and everyone was curious about how they were done. To be honest, even I needed a couple of attempts before finding an easy and pretty looking way to get them done.
And because everyone wanted to make them and didn't know how, it's time to post the Tutorial on how you can make Swirl Nails.

You Will Need:

- Two polishes of your choice
- Toothpick
- A plastic surface ( saran wrap or a plastic bag)


Step 1.
Pick your polishes and get a toothpick ready
Step 2.  
Spread out saran wrap or a plastic bag over a hard surface. I suggest you duct tape it in place so it doesn't move and ruin your polish while it's drying. Put a dab of the base polish and then a dab of the tip polish on top of it. You should make the whole dab more or less the size of your nails.
Step 3.  
Take your toothpick and swirl away! 
Step 4.
Well this is the part you need patience for : Let your swirl dry overnight, then using a toothpick or your nail, detach it from your plastic.
Step 5.
Put a base coat on your nail and BEFORE IT DRIES put the swirl on your nail. It will probably not fit perfectly so you can cut and bend it into shape. It also might be too small on the sides but that doesn't matter, it's really easy to fix!
Step 6.
After you've cut and formed your swirl transfer into shape, correct the edges with polish. Like you can see in the picture, the bottom ended up being uncovered, so I just put some extra pink polish where needed.

Clean it up, put a Top Coat on to hold it in place and you're ready to go!


I rally like that you're basically getting dry nails and all you have to do is wait for the top coat to dry, which, if you have a quick dry one, might just give you the fastest manicure you've ever had!

Hope you enjoyed the tutorial and I'd love if you let me know when you try it and show me the result!


 You can also Follow on * Twitter * FacebookBloglovin * 

Monday, September 17, 2012

Monday Blues: Snow Queen Nails

It's blue time of the week again!

I've been saying last week, when I posted the Swirl Nails,that I'm slowly and surely running out of blues but seems I can still find combinations where I can re-use some polishes.

Fact is, I'm more of a pastel person and blues and greens are an occasional purchase. But hey, it just makes your creativity go wild when you run out of colors and have to combine old ones to make something new.

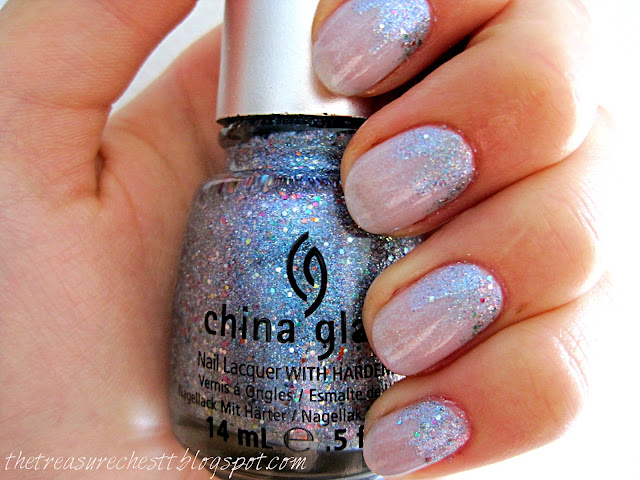
So today I used two polishes you've already seen. China Glaze Liquid Crystal and the Mi-Ny Glam F Blue to bring you Snow Queen Nails!

snow queen china glaze liquid crystal mi-ny inverted glitter manicure nails

We all know by now I have a serious love for glitter, and I recommend you read my intense raving about the China Glaze Liquid Crystal because it has to be one of the most fascinating polishes I own.

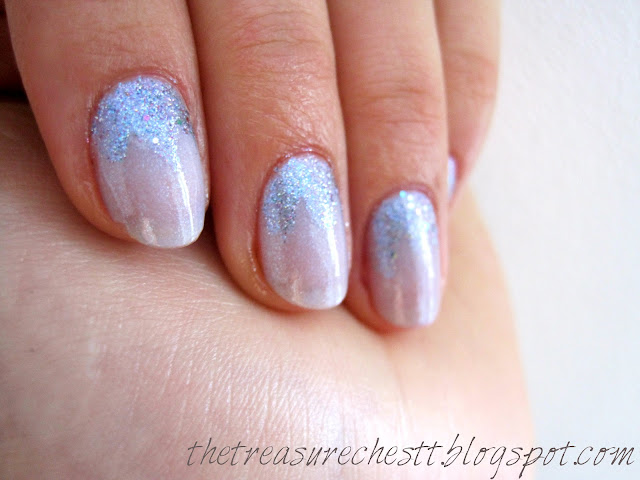
This manicure really gives me the feeling of ice and snow, thus the name I gave it. I think this will look even better in winter, with actual snow around.
I'm envisioning a white coat with these nails. Might need to go look for one now!

snow queen china glaze liquid crystal mi-ny inverted glitter manicure nails

I was really surprised to see how well these two colors work together and how subtle and girly these nails look. Also impressed about the fact that 3 days after, and there's no chipping. I think I should dedicate a post to my incredible top coat.

With that being said, I leave you to check out the other lovelies that take part in the Blues, and hope your Monday will mean a great start to the week!


Gosia from Life in Color!
Mihaela from Lacquerbuzz
Mandy from Chameleon Stampede
Marisa from Polish Obsession

You can also Follow on * Twitter * FacebookBloglovin * 

Sunday, September 16, 2012

Polyvore Collage Day

Today I'm starting a little thing that just proves how Polyvore is unbeatable when it comes to making collages.

The Polyvore Collage Day will be a day where after voting for a theme, you post your Plyvore Collages on a regular basis.
We pick a theme, you create a collage on Polyvore with whatever you find fits the theme, post in on your blog and connect it through the InLinkz link you will find here before the first Collage Day.

I would suggest Sundays for Collage Day. You have more time to let your inspiration run loose during the week-end, as I've been able to conclude. Schedule or post your collages on Sunday, Sept 23rd and then head over here to link them.

I find it a great way to connect not only Beauty but also Fashion Bloggers and without it being an actual Blog Hop, it will allow people to find both New Blogs and Inspiration.

IMPORTANT UPDATE

  1. Theme for this week ( Sept 23rd) is AUTUMN
  2. Schedule or post your collages on Sunday, Sept 23rd and then head over here to link them
  3. If you are taking part, leave me your email either in a comment or on Twitter @TreasureChestt so I can send you the code for inLinkz to post on your blog


You can also Follow on * Twitter * FacebookBloglovin * 

Saturday, September 15, 2012

Picking Eyeliners

When it comes to Beauty Essentials, it's mascara and eyeliners that I couldn't do without.
I've always liked that simple yet chic line across the eyelid but it took me a lot of testing before I found the perfect thing to do it with.

So here's why, I thought I could tell you a bit about each kind of eyeliner, so you might find it easier to find the one that is perfect for you.


I'm gonna post them in the order that I've used them. Like most of us, I too started out with a pencil

Pencil Eyeliners:

For a beginner, they're easy to use. You know how to handle a pencil and you can make a line somewhat easy.
What you can't do is create a cat eye look. No matter how sharp the tip, it's still too thick to make a fine line happen.
Another issue is that it smudges easiest. It's very practical for blending, but sooner or later you will end up with unwanted black stains around your eye. Because of is creaminess, it will also not stay on for too long, especially compared to other types of eyeliners.
Of course, they are an important part in creating the smoky eye look or if you want to line your waterline.

Liquid Eyeliners:

The next step from the pencil. When I discovered them,I as over the moon because I could finally do a fine line.
Obviously they aren't as easy to handle as a pencil and it takes some getting used to until you stop making a trembled line across the eyelid. What you can do with them is a thick cat eye look because their tip allows you to apply a larger quantity of color and you can fill in shapes very well. I also find these to have the most real waterproof formula. They truly don't move when they are waterproof.

Felt Tip Eyeliners:

These are the ones like the Lancome you can see on top of the picture. Because they come in pencil form,they are much easier to handle than the liquid eyeliners that come in a pot.
You have to test out the formula though because I've experienced some very sheer ones that looked more grey than black when applied. So look for one that is truly black.
They are a good pick if you want to make subtle lines and for cat eye looks.

Gel Eyeliners:

I'll go ahead and say that these are my favorite kind. They give you a very intense black color and are very precise in applying as you can use the brush of your choice to dip and create the look you want.
Another great thing about them is that they stay in place and last until you take them off. You will also,almost never have a gel eyeliner smudge.


Hope this helped you a bit in finding the right liner or just getting to know more about the other kinds of eyeliners out there.

What kind do you use?


You can also Follow on * Twitter * FacebookBloglovin * 

Friday, September 14, 2012

Metallic Polishes Top 5

This autumn, it seems to be all about metallic shades, especially what nail polish is concerned. The metallic comeback was more or less announced last year, when multi- and duochrome polishes started appearing.     ( Translation: polishes that have two or more clear color reflexes in them)

I'm glad to tell you, that many of last year's candidates have stayed with me and have become present favorites too. That's why, I'm going to show you my current Metallic Polish Top 5.

metallic chrome nail polishes catrice iron mermaiden mavala opi metallic mercury envy w7 in the bronx bronze green multichrome and duochrome


Off topic funny fact: I seem to be so fascinated by petrol looking metallics that I got 3 polishes in pretty much the same shade without realizing I do indeed have 3 too many now. But I don't mind, I can just do a comparison and see if you can tell the difference.

On we go with the TOP 5 then. I didn't put them in a particular order, as the favorites change by day and mood, so we shouldn't discriminate here.

metallic chrome nail polishes catrice iron mermaiden mavala opi metallic mercury envy w7 in the bronx bronze green multichrome and duochrome

Catrice  - In The Bronx

I did not expect the color I was going to get with this. I've used it in this Post and it is a stunning bronze with gold shimmers. To me, this color is the epitome of autumn. It's the shade that you get described in fairytales when they speak about how the nature transforms in autumn.

Catrice - Iron Mermaiden

This one was an even bigger surprise. I liked the way it looked in the bottle but when I put it on my nails I was amazed by the colors! It goes from silver to blue, to subtle green and up to a pinkish mauve. Absolutely incredible!
W7 - Metallic Mercury

As the name says, it's metallic and it tries to replicate the colors of Mercury. I find it to be pretty close to OPI's Every Month is Oktoberfest.

W7 - Envy

 One of the petrol shades I was talking about, but  luckily, this one goes more into blue than it does into green. It still looks lovely on the nails and it's also a metallic that has a color which stands out. Most metallics tend to be somewhat dark, but this one clearly wants to make a statement.

Mavala - Bronze Green

The nice people of Mavala have named it perfectly. Bronze Green it is indeed.It actually looks a bit more green than in this picture when you wear it but if you want it darker, you can just go ahead and do an extra coat.
So here they are, my Metallic Top 5. I'm quite sure that during autumn, I will be stocking up on more metallics and I might be showing you a new Top 5 by the time winter hits.


What about you, have you tried any of these and what are your favorite metallics for the season?


You can also Follow on * Twitter * FacebookBloglovin * 

Thursday, September 13, 2012

DIY Lip Scrub

I think each one of us has had someone tell them at least once that lipbalms, chapsticks and other lip moisturizers of the sort can cause addiction. It's true, if you constantly use them on your lips, you disrupt the natural cycle of your skin and then it ends up "asking" for them.

The natural circle consists in your skin being renewed and the dead skin cells being ditched and replaced by new ones. 
If you allow that to happen and stay hydrated, you will never feel your lips dry again

BUT we all know that today everyone uses something on their lips on a daily basis. This something forms a layer on them and prevents the dead skin cells from leaving the premisses. That in turn, makes your lips feel dry and as a normal reaction you moisturize some more. Talk about a shiny, lovely smelling vicious circle!

Here's what you CAN do:
If you are going to use balms anyway, then at least help the skin cycle a bit. You can do that by scrubbing.
The same way you use body scrubs, you can use lip scrubs.
The main difference is: lips are much more sensitive so don't go rubbing salt on them as that is very coarse and rugged and you will be cursing the day you've done so!

And why wait until you purchase a lip scrub if you already have all the ingredients at home and can make one yourself?

This is why, I will give you an easy breezy solution to stopping the dry sensation and making your lips love you even more.

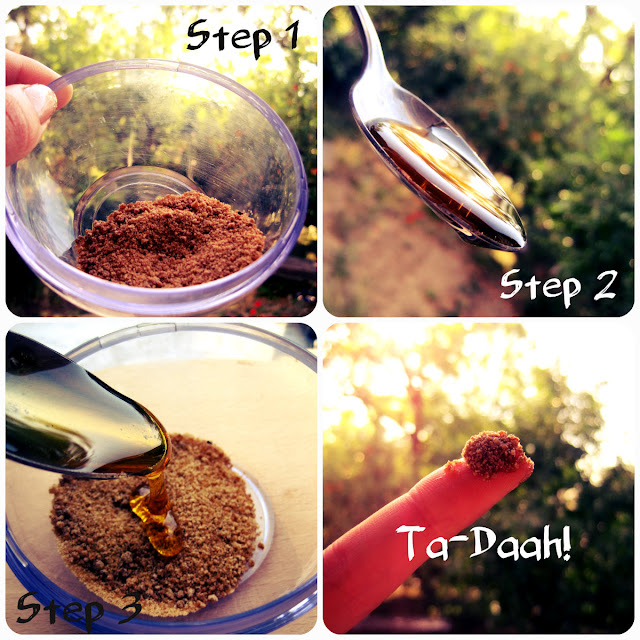
DIY sugar lip scrub tutorial with honey for dry lips


What You Need:

1 Tablespoon of Sugar + 1 Tablespoon of Honey

Step 1.

Put you sugar in a little bowl where you will be able to mix it without it falling out. I used Muscovado Sugar because it's quite fine but you can pick any sugar you like. Because it melts quite easily, you don't need to worry about damaging your lips. Sugar is the ideal candidate for a lip scrub.

Step 2.

Get a tablespoon  of honey. You can add more if you like it more liquid, it's all up to you.

Step 3.

Mix sugar and honey together. Ideally with a toothpick or a chopstick, something thin in any case. Because it isn't a large quantity, it's unpractical to try and mix it with a spoon.

Step 4.

Rub it on your lips with circling movements. You should feel the sugar scrubbing your skin and once you've done that you can either eat your scrub ( it is just sugary sweets after all) or rise it off with lukewarm water.


You can also Follow on * Twitter * FacebookBloglovin * 


Wednesday, September 12, 2012

Benefit Concealers Revealed


How great was that title?Huh?

Leaving my masters degree in Wordsmith behind, let’s proceed to comparing and analyzing these two.

Stay Don’t Stray and Boi-ing


Stay Don’t Stray

This is only a primer for the concealer that is going to be applied, but I was impressed with it. I think it can stand alone easy as it’s better at concealing than a lot of products specifically designed for that.
It really has amazing coverage and with a tiny drop, everything disappears. It needs a bit of blending as it is quite bright, but it doesn’t get any minus points for that.
I really liked what it does in terms of making dark circles go away!


Boi-ing

For an “industrial strength” concealer, I didn’t seem that powerful. I was surprised to see it cover less than the Stay Don’t Stray Primer. That one left no indication of something dark being underneath it, the Boi-ing on the other hand…kinda did.
I don’t think it was a bad choice of shade, as I had the brightest, so in theory it should have been comparable to the primer, if not even better.

BUT using the Boi-ing over the Stay Don’t Stray  primer will probably give you a beautiful result!


What I’ve been told great things about is the Erase Paste, also from Benefit. I have yet to try it,  but I have high hopes and if anything can replace my current concealer, I will praise it from here to the tips of the trees. So stay tuned, you might hear miracles being told about!


My problem with both of them is that they dry out on my face and give me wrinkles by creasing in a very weird manner. I mean, I know my face and I know I’m at least 10 years too young for wrinkles, especially under my eyes.

The dryness might have something to do with the fact that I never use foundation so I just applied it on my bare skin, but then my question is, was it just created to be put on a foundation or primer base? It’s a bit discriminatory towards people like me who chose not to or well…don’t really need the base. Not trying to sound patronizing, but I just need concealer as my skin is quite good in its natural state and I’d like to keep it free for as long as my genes allow me.

But that was my only complain, the texture just didn’t fit my skin or my routine. I think because I’m used to the texture and blending behavior of my Rimmel Concealer, I expect it from others too. I think I’ll just stick to that one though.

If I’d have to pick a favorite, it would be Stay Don’t Stray for sure. It really covered up nicely and it’s just a concealer base. I personally would use it alone as it does a great job in hiding things. Not to mention that you can use it on a number of areas, seen as it is indeed a primer. The concealer part is my personal opinion on how you can use it, because I was really impressed by its coverage.


You can also Follow on * Twitter * FacebookBloglovin * 

LinkWithin

Related Posts Plugin for WordPress, Blogger...